

In this post, we will build a GPU-powered deep learning development server. We will use Docker to containerize the Jupyter Lab environment. The server also features a shared data and notebooks directories among the users.
Introduction
Development servers with high computing power are important for research groups. Because of that, there are multiple solutions from various companies. Google has its Colab environment as well as the Kaggle community. Those environments supply processing power including GPUs and TPUs to their users.
The main problem with these environments is to isolate each users’ environment from each other via a containerized solution. At this point, you may be heard of the name Docker/Kubernetes. Most of those solutions use Docker under the hood. If you have any experience with, for example, Docker, the chances that you might see the current Docker version text in the sidebar is very high.
Isolating environments from each other is one point. However, another point is the access management part of those isolated environments. In Kaggle, access management to the containers is embedded in the site itself. In Colab, this process is handled by Google Accounts. Thus, if you want to set up a site like those, you have to handle the access management by yourself.
Prerequisites
Concepts about Linux
- Know how to use a Linux machine from remote via SSH.
- Understand how network namespaces work under Linux.
- Understand what is the mount concept and how mounting works under Linux.
Concepts about Docker
- Some working experience with Docker.
- Know how to create new images.
- Know how to customize existing images.
- Some knowledge about Docker Compose.
Concepts about Other Staff
- Knowledge about Git will make your life easier.
JupyterHub
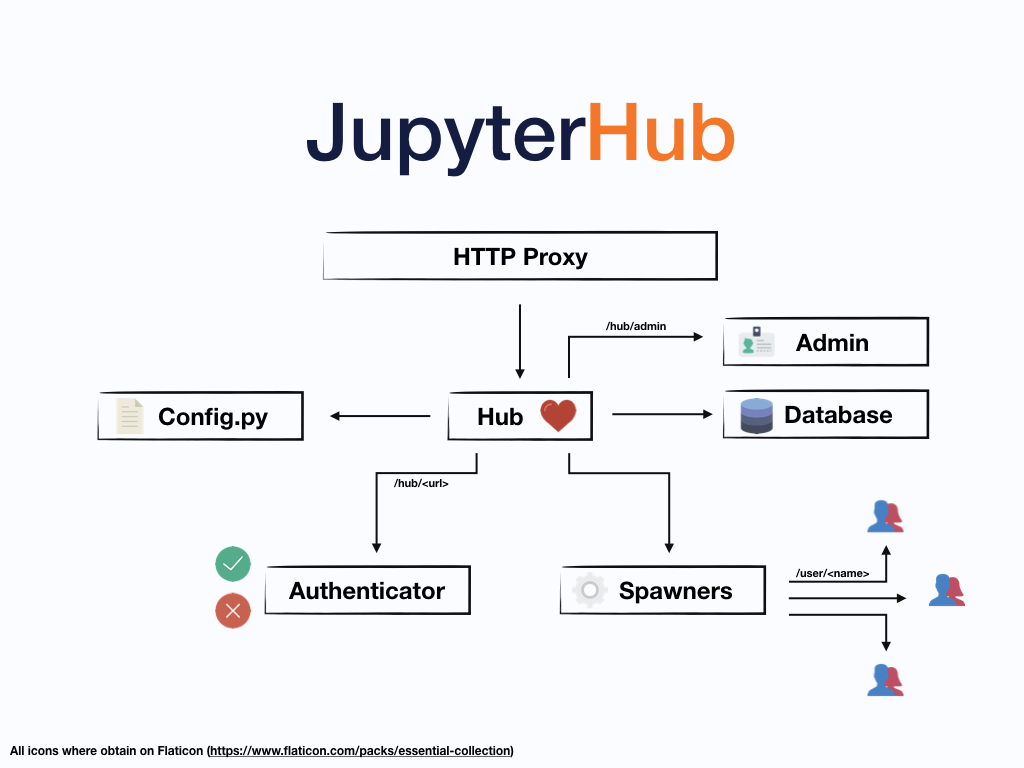
JupyterHub is an open-source multi-user version of the notebook designed for companies, classrooms and research labs. It is designed to manage user access to notebook servers via several authentication mechanisms. Essentially, JupyterHub is a web server running as a proxy to other isolated Jupyter Notebooks/Jupyter Labs used by different users. The following image is taken from the official documentation of JupyterHub and explains the working principle of it.
Authentication
JupyterHub provides some basic user management and administration features. For example, you can whitelist some users or blacklist them, assign special permissions to them, etc.
For the authentication, several methods is listed below:
- Local Authenticator
- OAuthenticator
- Dummy Authenticator
There are more of them. You can check the documentation.
Local Authenticator manages users on the local system. If you add a new user
to JupyterHub, the user is created for the system with the command adduser.
If you do not want to change the system users, you should not use this
authenticator.
OAuthenticator is a way to get access to protected data from an application. It is safer and more secure than asking users to log in with passwords. If you are planning to open JupyterHub to the public, this may be the right choice.
Dummy Authenticator is the simplest type of authenticator. It allows you to set any username-password pair. You can also set a global password and all users who know the correct global password can successfully login to the JupyterHub.
Notebook Spawners
JupyterHub’s main purpose is to spawning single-user notebooks for the
authenticated users. A single-user notebook is just an instance of
jupyter notebook. Jupyter notebook is available in many formats for different
operating systems. One can install it via package managers (i.e. conda,
pacman) or via pip. However, if you do not want to fill your machine with
random junk, you can run notebooks on a Docker image. You can find official
docker stacks in the Github.
For spawning notebook servers, JupyterHub provides the following methods:
- Native Spawner
- Docker Spawner
Again, there are lots of them. You can check the documentation for the full list.
Native Spawner spawns notebooks from the installed version of the Jupyter Notebook. This version uses the libraries and frameworks from the main system. To add new libraries or frameworks, you have to install them into the main system.
Docker Spawner spawns notebooks from a prepared Docker image. If you need to
add libraries or frameworks to the notebooks, you have to add them to the
respected Dockerfile and rebuild the Docker image. This spawner type has the
main focus of this post.
Customizing the JupyterHub Docker Image
JupyterHub has an official Docker image. This image
contains only the JupyterHub service itself. The notebook, authentication
mechanisms and/or any configuration is not included. One has to derive a new
image from this official image. The correct way of doing this is, of course,
preparing a new Dockerfile.
Writing the Dockerfile for JupyterHub
The first thing to do in the Dockerfile is to setting the base image. In this
case, base image is the official JupyterHub image. Add the following command as
the first line of the Dockerfile of your custom JupyterHub image.
FROM jupyterhub/jupyterhub
Depending on the choice of spawners and authenticators, you have to install some
packages. The following snippet installs dockerspawner and oauthenticator to
spawn notebooks from a notebook image and using Github accounts for
authenticaton.
RUN pip install dockerspawner oauthenticator
The final part is to copying the configuration file for the JupyterHub to the inside of the image by using the following command.
COPY jupyterhub_config.py .
This command assumes that the jupyterhub_config.py file is in the same
directory with the Dockerfile. The overall view of the Dockerfile should
look likes to the following snippet.
FROM jupyterhub/jupyterhub
RUN pip install dockerspawner oauthenticator
COPY jupyterhub_config.py .
When you build the image defined in the Dockerfile with the following command,
you will have a ready-to-run JupyterHub image for the next phases.
$ docker build --rm -t jupyterhub .
As a refresher, the final dot(.) means the current directory. Here the tag of
the prepared image is jupyterhub. If you run the following command, you can
see the image.
$ docker image ls
Output looks like this:
REPOSITORY              TAG           IMAGE ID        CREATED             SIZE
jupyterhub              latest        cb9bfc0fc293    14 hours ago        935MB
salda-special           latest        4847a31b61b7    6 days ago          9.85GB
tensorflow-notebook     latest        7fe345b290f6    2 weeks ago         8.68GB
scipy-notebook          latest        5f5f71c0d6b9    2 weeks ago         6.89GB
minimal-notebook        latest        f9df51d25171    2 weeks ago         5.91GB
base-notebook           latest        328581e70c7b    2 weeks ago         4.25GB
pclink                  0.1.0-alpha   44ca70efcd30    2 months ago        660MB
nextcloud               latest        7ec24835eb2d    2 months ago        724MB
nginx                   1             6678c7c2e56c    2 months ago        127MB
mariadb                 10.4          1fd0e719c495    2 months ago        356MB
mariadb                 10.4.12       1fd0e719c495    2 months ago        356MB
python                  3-alpine      537dfdf79ddc    2 months ago        107MB
ubuntu                  18.04         72300a873c2c    2 months ago        64.2MB
ubuntu                  latest        a2a15febcdf3    9 months ago        64.2MB
jupyterhub/jupyterhub   latest        64d82994fd55    12 months ago       932MB
openproject/community   8             99757bbbc2a4    14 months ago       1.59GB
Configuring the JupyterHub
Previously mentioned jupyterhub_config.py file contains the necessary
information to configure JupyterHub. You can see an example configuration in the
following snippet.
import os

c.JupyterHub.spawner_class = "dockerspawner.DockerSpawner"
c.DockerSpawner.image = os.environ["DOCKER_JUPYTER_IMAGE"]
c.DockerSpawner.network_name = os.environ["DOCKER_NETWORK_NAME"]
c.JupyterHub.hub_ip = os.environ["HUB_IP"]
c.Authenticator.admin_users = {'user1', 'user2'}

from oauthenticator.github import GitHubOAuthenticator
c.JupyterHub.authenticator_class = GitHubOAuthenticator

c.GitHubOAuthenticator.oauth_callback_url = \
                    'http://<host_ip_addr>/hub/oauth_callback'
c.GitHubOAuthenticator.client_id = '<client_id>'
c.GitHubOAuthenticator.client_secret = '<client_secret>'

notebook_dir = os.environ.get('DOCKER_NOTEBOOK_DIR') or '/home/jovyan/work'
c.DockerSpawner.notebook_dir = notebook_dir

# Mount the real user's Docker volume on the host to the notebook user's
# notebook directory in the container
c.DockerSpawner.volumes = {
          'jupyterhub-user-{username}': notebook_dir,
          'jupyterhub-shared': '/home/jovyan/work/shared',
          'jupyterhub-data': '/home/jovyan/work/data'
}

c.DockerSpawner.remove_containers = True
c.Spawner.default_url = '/lab'
Spawner and Network Configurations
As you can see from the code snippet, the spawner_class attribute is set to
the dockerspawner.DockerSpawner class. This means that when the user logs in
the notebook is spawned in a Docker container. However, you also need to provide
the image, container, network, and volume properties.
- By using the
imageproperty of theDockerSpawner, you can set the image which will be used while creating the containers. - By using the
network_name, you can set the network name. This is important because when the container is started you have to tell the Docker which network the newly created container will join. - By using the
notebook_dirproperty, you can set the mount point for the Jupyter Notebook.
If you want persistent storage for your users. You have to assign a volume for
each of them. The volumes property can be a dict() object. Keys of the
dictionary are the volume names and values are the mount points. In this
example, a volume for each user is created. Besides, if you want to share data
among users, you can also set other fixed named volumes as well.
Then, you have to specify the hub_ip. This is the ip address of the JupyterHub
container. In Docker, the ip addresses of the containers in network namespaces
are resolved by using their names by internal DNS records. Those environment
variables will be set in the docker-compose.yml file in a later section.
Authentication Configurations
You can use any of the previously mentioned authentication methods. In this
example, OAuthentication with Github accounts is used.
To do this one have to import the GitHubOAuthenticator class and set it to the
authenticator_class for the JupyterHub. After doing that, you can use the
properties of the GitHubOAuthenticator. You should make the necessary
configuration in the Github side and then set the oauth_callback_url,
client_id, and client_secret variables.
The Github configuration for OAuth is quite simple. You should define a new application for your user. Each application with OAuth have a unique id and secret. You should paste the id and secret to the specified places in the configuration file.
Miscellaneous Configuration Options
The last two lines of the configuration file are optional.
The first one indicates that if a user stops her/his notebook server, then the corresponding container will be deleted.
The second one indicates that the default interface is the JupyterLab and not Jupyter Notebook. Jupyter Notebook is fine with its extensions as such. But, the interface is not as usable as JupyterLab’s interface.
Customizing the Docker Stack
Luckily, Jupyter project provides official docker stacks for various purposes.
If you follow this link you can see many *-notebook
images in the repository. These notebooks are in a hierarchical order. One can
express this order as a tree structure.
- base-notebook
- minimal-notebook
- r-notebook
- scipy-notebook
- datascience-notebook
- pyspark-notebook
- all-spark-notebook
- tensorflow-notebook
- minimal-notebook
All notebooks are either directly or indirectly derived from base-notebook.
This notebook directs the underlying system to install all the necessary
packages to run a Jupyter (Notebook | Lab).
If you need any additional packages or libraries, you can clone this repository
and add necessary packages and libraries to the any Dockerfile you want.
However, if you changed any node other than a leaf in the hierarchy, you have to
rebuild all the other dependent images to take your changes in effect.
For example, I generally make a brand new image from the tensorflow-notebook
and add whatever libraries or packages that I want to install. By doing this,
the original Dockerfiles stays untouched and the risk of failure is minimized.
Running Tensorflow with GPU Support
Running Tensorflow with GPU is a little tricky. However, if you follow the documentation of Tensorflow strictly, the chances that you will have any problems is low. Regardless of running the Tensorflow in Docker or not, you must have the NVIDIA drivers installed in the host computer.
To run the whole official docker stack with NVIDIA CUDA 10.1 and CUDNN 7.x
(those are the requirements of Tensorflow v2.1.0), you have to change the base
image of the base-notebook. The first line of the base-notebook should look
like this.
ARG ROOT_CONTAINER=nvidia/cuda:10.1-cudnn7-devel-ubuntu18.04
ARG BASE_CONTAINER=$ROOT_CONTAINER
FROM $BASE_CONTAINER
With those lines, the base-notebook now relies on the official Docker image of
NVIDIA. When you change the base-notebook you have to rebuild all the other
images that built upon it. This means that you have to rebuild all other
*-notebook images from scratch. This process is time consuming but
straightforward.
From this point, all of your docker stack images have capable of running their codes on the GPU. To give the ability of using GPUs to Docker, you have to install the NVIDIA Container Toolkit. To do this, write the following commands to a terminal.
$ # Add the package repositories
$ distribution=$(. /etc/os-release;echo $ID$VERSION_ID)
$ curl -s -L https://nvidia.github.io/nvidia-docker/gpgkey | sudo apt-key add -
$ curl -s -L https://nvidia.github.io/nvidia-docker/$distribution/nvidia-docker.list | sudo tee /etc/apt/sources.list.d/nvidia-docker.list
$ sudo apt-get update && sudo apt-get install -y nvidia-container-toolkit
$ sudo systemctl restart docker
After installing the nvidia-container-toolkit and restarting docker daemon,
you can run the nvidia-smi command and see if you can access the GPU.
$ #### Test nvidia-smi with the latest official CUDA image
$ docker run --rm --gpus all nvidia/cuda:10.1-base nvidia-smi
You should see a result similar to this:
Sat May 16 20:38:33 2020
+-----------------------------------------------------------------------------+
| NVIDIA-SMI 440.64.00    Driver Version: 440.64.00    CUDA Version: 10.1     |
|-------------------------------+----------------------+----------------------+
| GPU  Name        Persistence-M| Bus-Id        Disp.A | Volatile Uncorr. ECC |
| Fan  Temp  Perf  Pwr:Usage/Cap|         Memory-Usage | GPU-Util  Compute M. |
|===============================+======================+======================|
|   0  GeForce GTX 1080    On   | 00000000:01:00.0 Off |                  N/A |
|  0%   34C    P8     8W / 200W |   7997MiB /  8116MiB |      0%      Default |
+-------------------------------+----------------------+----------------------+

+-----------------------------------------------------------------------------+
| Processes:                                                       GPU Memory |
|  GPU       PID   Type   Process name                             Usage      |
|=============================================================================|
|    0      9174      C   /opt/conda/bin/python                       7985MiB |
+-----------------------------------------------------------------------------+
It means that you have successfuly installed the NVIDIA Container Toolkit and reached the onboard GPU.
The only remaining thing at this point is enabling GPU support for tensorflow.
To do this one should edit the Dockerfile of the tensorflow-notebook. The
line containing the following code:
# Install Tensorflow
RUN pip install --quiet \
    'tensorflow==2.1.0' && \
    fix-permissions $CONDA_DIR && \
    fix-permissions /home/$NB_USER
Should be changed to:
# Install Tensorflow
RUN pip install --quiet \
    'tensorflow-gpu==2.1.0' && \
    fix-permissions $CONDA_DIR && \
    fix-permissions /home/$NB_USER
That’s all. Now, the containers of this image can capable of using the onboard GPU.
Getting Everything Together - Docker Compose
Up to this point, we customize and build multiple images. These images need an orchestrator to work together. Although there are various choices that you can choose to do the orchestration, this document will explain how you can use Docker Compose in such a task.
Docker Compose is just a plugin to the Docker. Because of that, it is very lightweight. Docker Compose gets an YAML file. The YAML file contains the definitions of services, service properties and relationships between services.
The default name for the YAML file is docker-compose.yml. The directory
structure including the docker-compose.yml is as follows.
.
├── docker-compose.yml
├── docker-stacks
│   ├── all-spark-notebook
│   ├── base-notebook
│   ├── binder
│   ├── CODE_OF_CONDUCT.md
│   ├── conftest.py
│   ├── CONTRIBUTING.md
│   ├── datascience-notebook
│   ├── docs
│   ├── examples
│   ├── LICENSE.md
│   ├── Makefile
│   ├── minimal-notebook
│   ├── pyspark-notebook
│   ├── pytest.ini
│   ├── README.md
│   ├── requirements-dev.txt
│   ├── r-notebook
│   ├── scipy-notebook
│   ├── tensorflow-notebook
│   └── test
└── jupyterhub
    ├── Dockerfile
    └── jupyterhub_config.py

21 directories, 11 files
As you can see from the directory structure, the docker-compose.yml stands
together with directories named jupyterhub and the docker-stacks repository.
The necessary information to prepare both of those directories are given in the
previous sections.
The following is a sample YAML file for a complete containerized JupyterHub configuration.
version: '2.3'

services:
  jupyterhub:
    build: ./jupyterhub
    image: jupyterhub
    ports:
      - "80:8000"
    container_name: jupyterhub-container
    volumes:
      - /var/run/docker.sock:/var/run/docker.sock
      - jupyterhub_data:/srv/jupyterhub
    environment:
      DOCKER_JUPYTER_CONTAINER: jupyter-notebook
      DOCKER_JUPYTER_IMAGE: tensorflow-notebook
      DOCKER_NETWORK_NAME: ${COMPOSE_PROJECT_NAME}_default
      HUB_IP: jupyterhub

volumes:
  jupyterhub_data:
All docker-compose.yml files need a version key. This line tells the Docker
Compose to use which version of the Docker Compose parser. Then, within the
services key, one service is created, jupyterhub.
Docker Compose Configuration for JupyterHub Service
The build subkey indicates the place for the image to be used. Since the
docker-compose.yml file lays in the same place with the jupyterhub
directory, the value should be ./jupyterhub.
The value of image subkey is the name of the produced image when you build
the service.
The ports subkey is an array and self-explanatory. It indicates the
dest:source port forwarding.
container_name is the name of the container when you create an instance.
volumes are the volumes to be mounted. The left hand side of the string
states the source. Source can be either a volume or a directory from the host
machine. The first entry is a special one. Without this entry, JupyterHub cannot
be able to spawn Jupyter Notebook containers. The second volume makes the
database and configuration information persistent across restarts and rebuilds.
environment defines environment variables that will be defined in the
JupyterHub container. Notice that those environment variables are the ones that
are used in the JupyterHub configuration file.
Conclusion
Owning a research server allowing multiple users interact with it at the same time is an important asset for research teams. In this post, it was explained how to set up a server with these features. This type of posts are relatively important because there is not much information about getting those things together. I hope you are enjoyed and informed. Feel free to provide any feedback related or not related to the post. See you…